Glass Button Tutorial – In Java

Create glass effect buttons using nothing but Java code and JTexGen, a procedural texture library for Java. First create a new project in your favorite IDE and add the JTextGen jar file, or create a new maven project and add the JTexgen dependency if you installed it from the source distribution into your local repository.
Our glass button will be round-ish, and will have a margin at the edge where we will render the shadow. We’ll start by writing our main method and creating the glass button class and rendering it. First create a new class called GlassButton.java and make it extend AbstractTexture. We’ll add a constructor that takes the base color of the button and returns it in the getColor method.
public class GlassButton extends AbstractTexture {

	private final RGBAColor color;

	public GlassButton(RGBAColor color) {
		this.color = new RGBAColor(color);
	}

	public void getColor(double u, double v, RGBAColor value) {
		value.setColor(color);
	}
}
Next we’ll create our main class and add some code to create and render our texture.
public class Main {

	public static void main(String[] args) {
		RGBAColor color = RGBAColor.red();
		Texture texture = new Background(new GlassButton(color),RGBAColor.white());
		TextureViewer.show(texture);
	}
}
Ok, a fairly simple start, we create our texture with a red color over a white background and pass it to the viewer. If you save and run this, you should get a window with a start button, which will render the red texture when clicked. Let’s add a method to our texture to calculate where on the button the textures u,v co-ordinates are. We do this by calculating the distance from the center of the texture the U,V co-ordinates are. The value returned will range from 0..1 inside the circle and outside the circle, it will return 1+ and grow larger the further it gets from the center. This lets us determine what should appear for any given point on the texture. Since we want a border around the edge of the button, we will have to scale the u,v values so when the result ramps up to 1 before getting to the edge of the texture. Add the following method to the GlassButton class.
protected double calculateCircleRange(double u,double v) {
	//displace point
	u = u - 0.5;
	v = v - 0.5;
	//calculate distance
	double distance = Math.sqrt((u*u)+(v*v));
	//double it since the range will only be from 0 to 0.5
	return distance * 2;
}
We can verify this works by changing our get value method to return this value in the alpha channel.
public void getColor(double u, double v, RGBAColor value) {
	double range = calculateCircleRange(u, v) * 1.2;
	value.setColor(color);
	value.setAlpha(1-range);
}

We inverted the signal (1-range) so the color would be stronger at the center and weaker at the edge. Since the range goes beyond 1, then the value is truncated to the range 0..1 which is why the pattern repeats at the edge of the circle.
What we need to do is calculate the color based on the return value of this function. Values greater than 1 will result in rendering the shadow with a strength inversely proportional to the distance from the edge. For 0 to 1 values, we will render the button color and overlay the highlight onto it. We will also add an inner shadow in the range 0.7 to 1 with a strength based on the distance from the edge. The button color will consists of a base color which slowly transforms into a darker version of that base color the further down the button we go. The highlight is added as a lighter version of the base color with the alpha channel decreasing the further down the button we go. This has the effect of fading out the highlight the further down we go. Let’s flesh out a simple version to indicate where each piece is going.
public void getColor(double u, double v, RGBAColor value) {
	double range = calculateCircleRange(u, v) * 1.2;

	if (range > 1) {
		//render shadow
		value.setColor(RGBAColor.black());
		return;
	}

	value.setColor(color);

	if (range > 0.7) {
		value.setColor(RGBAColor.yellow());
	}
}
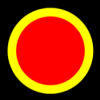
This gives us a fairly predictable result, you can see where the button ends and the shadow starts and you can see which parts the inner shadow affects. We multiply the range value by 1.2 so we can shrink the circle down a bit to give us our margin around the edge for the shadow to sit in.
Time to add some actual colors to our template starting with the shadow. Our shadow is essentially the color black with the alpha ranging from 0.9 to 0 based on how far the point is from the edge of the button. We make the shadow fall off exponentially so the shadow becomes much lighter faster. Bear in mind that the range value for the shadow area is 1+ so we need to adjust the value into the 0..1 range.
public void getColor(double u, double v, RGBAColor value) {
	double range = calculateCircleRange(u, v) * 1.2;

	if (range > 1) {
		//render shadow
		value.setColor(RGBAColor.black());
		double shadow = Math.pow(2-range-0.1, 8);
		value.setAlpha( shadow);
		return;
	}

	value.setColor(color);

	if (range > 0.8) {
		value.setColor(RGBAColor.yellow());
	}
}
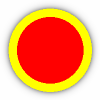
We specified a white background in our main class and the shadow has a varying alpha value so the white background show through. We can also change the background to see how it looks on different colors.
Now would be a good time to set up the different colors we’ll be using in our button. We have our base color passed in to the constructor, and from that, we can calculate the darker button color and the lighter highlight color. Let’s add those in to the constructor first.
public class GlassButton extends AbstractTexture {

	private final RGBAColor color;
	private final RGBAColor darkerColor;
	private final RGBAColor highlightColor;

	public GlassButton(RGBAColor color) {
		this.color = new RGBAColor(color);

		//make a copy and darken it
		this.darkerColor = new RGBAColor(color);
		this.darkerColor.merge(RGBAColor.black(),0.5);

		//make a copy and lighten it
		this.highlightColor = new RGBAColor(color);
		this.highlightColor.merge(RGBAColor.white(),0.8);
	}
With our colors in place, we can start adding them to the final button image. We’ll start with the main button color which ranges from the base color to dark color as the v value increases and we evaluate pixels further down the image. This can be done with one line of code since we take the base color and merge the darker color based on the v value after we assign the base color to the value.
value.setColor(color);
value.merge(darkerColor,(v-0.1)*1.2);

We shift and scale the v value to try and make the color transformation apply across the whole face of the button which is scaled down. This gives as a gentle transformation across the face of the button.
The button has an inner shadow which gives us the impression that the edges of the button are bending away from us. The code for this looks at the circle range value and if greater than 0.8 adds the inner shadow based on the distance from the edge. To calculate this, we subtract the 0.8 and scale it to get a value in the range of 0 to 0.4 which is perfect since we don’t want a strong shadow.
		//add the inner shadow
		if (range > 0.8) {
			double shadow = (range-0.8)*2;
			value.merge(RGBAColor.black(),shadow);
		}
The last piece we need to add is the highlight which is rendered in the shape of an smaller circle that is offset upwards slightly. This means we can reuse our calculateCircleRange method to determine which points are in the smaller circle. Once we have determined whether we are in the highlight circle or not we will merge the highlight color based on the v value so the highlight fades out as we move down the button.
Here is the complete getColor method with the code to add the highlight at the end.
public void getColor(double u, double v, RGBAColor value) {
	double range = calculateCircleRange(u, v) * 1.2;

	if (range > 1) {
		// render shadow
		value.setColor(RGBAColor.black());
		double shadow = Math.pow(2 - range - 0.1, 8);
		value.setAlpha(shadow);
		return;
	}

	// set the base color
	value.setColor(color);

	// add the darker color transform
	value.merge(darkerColor, (v - 0.1) * 1.2);

	// add the inner shadow
	if (range > 0.8) {
		double shadow = (range - 0.8) * 2;
		value.merge(RGBAColor.black(), shadow);
	}

	// finally add the highlight
	double highlightRadius = calculateCircleRange(u, v + 0.05) * 1.5;
	if (highlightRadius < 1) {
		double highlight = v * 2;
		value.merge(highlightColor, Gradient.clip(1 - highlight));
	}
}

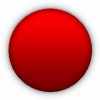
This is our final button image which is a round red glass button. However, because this is a procedural texture, we can scale the image in both the u and v directions without loss of quality and we can also create oval buttons. Below you can see a number of different variations.
I’ve also added an enhancement with regards to the inner shadow. Rather than making it a fixed black color, I have used a ColorGradient so the inner shadow transforms from dark to light from the top to the bottom of the button. We did this by adding this private member
private final ColorGradient shadowColor = ColorGradient.buildBlackAndWhite();
and in our inner shadow code, we use this gradient color instead of the fixed black color :
	// add the inner shadow
	if (range > 0.8) {
		double shadow = (range - 0.8) * 2.5;
		value.merge(shadowColor.interpolate((v+0.3)), shadow);
	}
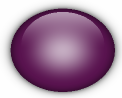
Also, for the last image, instead of using a solid color, I used a ColorGradient from the highlight color to the base color and then the darker color to give it that radial gradient. I plan on writing a generalized version of this texture for inclusion in the next release that will let you set parameters and even pass Texture objects for the main color and the inner shadow.


11 thoughts on “Glass Button Tutorial – In Java”
Comments are closed.
Wow, Great article. Never thought that Pure Java coding can be used to create such beautiful buttons then using Photoshop!!
Good.. keep it up..
Interesting and nice, but that is not a button, it is a drawn image.
A “button” would have all the behavior of a JButton and I see none of that here.
Dude, the buttons are meant to replicate the images created in photoshop to be used for web pages. However, there is no reason that you couldn’t render this to a backing image and render it with Swing, especially since the procedural texture means that it would be able to scale to any size the Swing button needed.
Is it me or is the top edge of the inner circle a bit edgy?
I can see unaliased pixels there
Ivan, Yes there is some aliasing on the inner highlight circle. The default anti-aliasing just uses multiple samples to smooth the image. Real anti-aliasing needs to be implemented in the shader which we can do by altering the alpha the closer we get to the edge of the circle.
i copied the coding and tried it to run on netbeans ide but it generates an error that RGBColor class not found.plz help me on this.
i am really excited to make these buttons as they look very beautiful.
Did you put the jtexgen.jar file in the build path? In the project, there is a library folder, right click on it and click “Add Jar/Folder”, and in the file pop up, locate the jar file and add it.
If you are using maven, then you need to run mvn install in the jtexgen download directory to build and install it. You can then add it as a maven dependency using “org.jtexgen” as the groupid and jtexgen as the artifact name.
Cheers,
Andy
hi, very nice stuff,
can you tell me please, how can i make rectangle buttons?
what should i change in calculateCircleRange function?