JSF Page Templates With Facelets
Templating is a very powerful feature for developing web applications with many pages that follow the same layout and design. This article demonstrates how to use facelets to create reusable templates for JSF pages.
Templating allows us to define the static parts of a web page in one location and define placeholders to insert non-static page content. It makes it much easier to build applications with pages that are consistent and easy to maintain since boilerplate content is mostly limited to the template and reused everywhere so we only have to change it one location.
Facelets officially became the official JSF templating framework in JSF 2.0. We define templates in our web application and then pull those into our web page. The template contains placeholders which we will push our page content into.
I’m going to be using Netbeans to help generate my template. I’ll start by creating a new maven web application bound to a server, in this case WildFly. Once the application is created, you can right click on the project and select to create a new Faces Template which will create the following dialog :
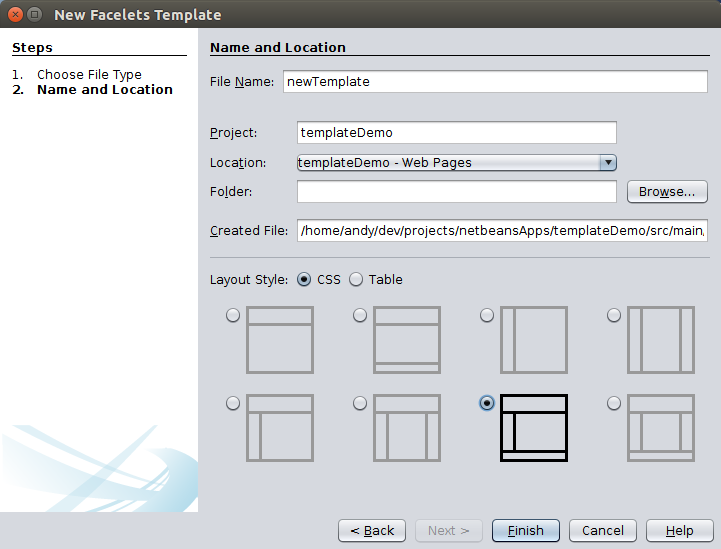
This dialog lets you choose the type of layout you want to use, and whether to create the layout using CSS or tables. This produces the following output :
<?xml version='1.0' encoding='UTF-8' ?>
<!DOCTYPE html PUBLIC "-//W3C//DTD XHTML 1.0 Transitional//EN" "http://www.w3.org/TR/xhtml1/DTD/xhtml1-transitional.dtd">
<html xmlns="http://www.w3.org/1999/xhtml"
      xmlns:ui="http://xmlns.jcp.org/jsf/facelets"
      xmlns:h="http://xmlns.jcp.org/jsf/html">

    <h:head>
        <meta http-equiv="Content-Type" content="text/html; charset=UTF-8" />
        <h:outputStylesheet name="./css/default.css"/>
        <h:outputStylesheet name="./css/cssLayout.css"/>
        <title>Facelets Template</title>
    </h:head>

    <h:body>

        <div id="top">
            <ui:insert name="top">Top</ui:insert>
        </div>
        <div>
            <div id="left">
                <ui:insert name="left">Left</ui:insert>
            </div>
            <div id="content" class="left_content">
                <ui:insert name="content">Content</ui:insert>
            </div>
        </div>
        <div id="bottom">
            <ui:insert name="bottom">Bottom</ui:insert>
        </div>

    </h:body>

</html>
This is a fairly standard JSF page that has the usual elements such as a body and header with stylesheets. It also has several ui:insert tags which create placeholders in our template which matches the sections we selected on the template dialog. The name on the placeholders is used to push our content into the placeholders by na,e. Any content in the placeholders in the template, will be overwritten by the template client content inserted into the placeholder. However, putting content in the template here gives you the opportunity to have default content in case the template client page doesn’t use it.
We can use Netbeans to create a template client page for our template by right clicking on the project and selecting New->Facelets Template Client :
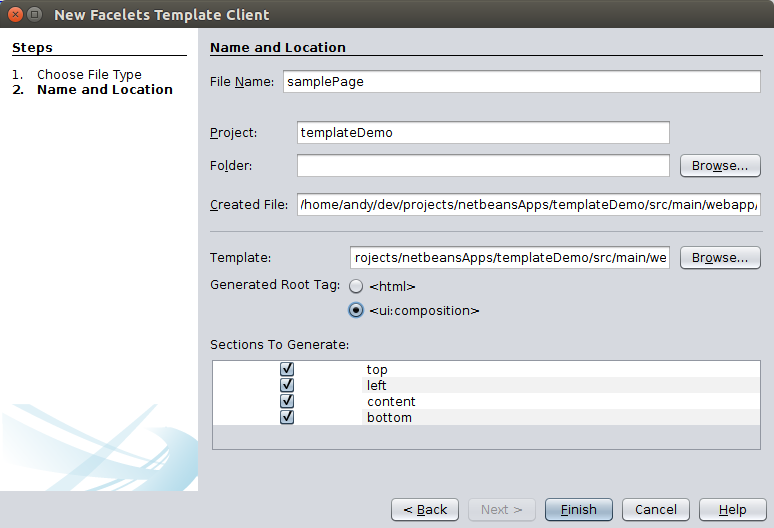
This dialog will not only let us select the template we want to use in our new page, but it also offers to create the page with the placeholder sections generated. We also have the option of creating the page based on the ui:composition tag or an html page containing the ui:composition. For now, we’ll just create the composition :
<?xml version='1.0' encoding='UTF-8' ?>
<!DOCTYPE composition PUBLIC "-//W3C//DTD XHTML 1.0 Transitional//EN" "http://www.w3.org/TR/xhtml1/DTD/xhtml1-transitional.dtd">
<ui:composition xmlns:ui="http://xmlns.jcp.org/jsf/facelets"
                template="./template.xhtml">

    <ui:define name="top">
        Top Content
    </ui:define>

    <ui:define name="left">
        Sidebar Content
    </ui:define>

    <ui:define name="content">
        Main Content Goes Here!
    </ui:define>

    <ui:define name="bottom">
        Footer goes here
    </ui:define>

</ui:composition>
This page starts with the composition tag that references the template file it is to be used with. The rest of the page contains ui:define tags for all the placeholder references in the template file. I’ve modified the content so you can see it in the final page :
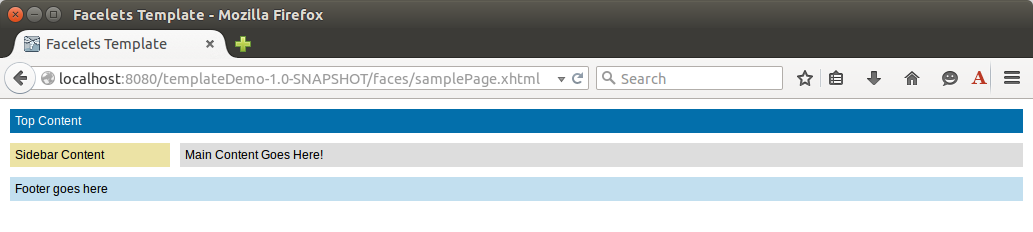
This reflects the layout in the template.xhtml file with the content from our sample file JSF page. As we add more pages to our web application, we create new composition pages that make use of the template. The key point is that we have a separation between our content and structure.
What does templating do for us? Well, if we decide to make any changes to the layout, we don’t have to make it in multiple places. We could rewrite the whole template and our pages would still function just the same as long as our placeholders are still present.Some thought must be given as to what placeholders you need in your application before you start writing template client pages.
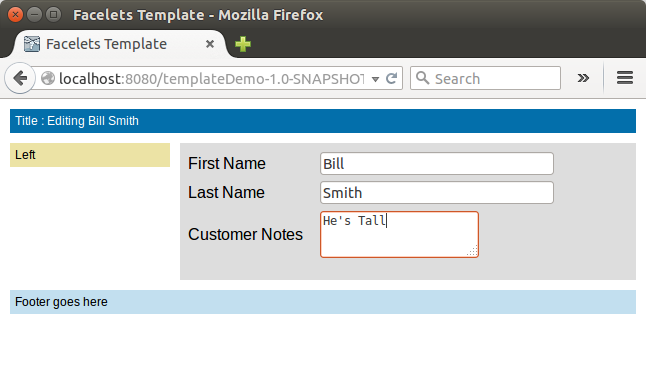
You could create or include more complex content in the template placeholders if that would be needed. The quick example below shows how you can display a form in the template instead of text.
<?xml version='1.0' encoding='UTF-8' ?>
<!DOCTYPE composition PUBLIC "-//W3C//DTD XHTML 1.0 Transitional//EN" "http://www.w3.org/TR/xhtml1/DTD/xhtml1-transitional.dtd">
<ui:composition xmlns:ui="http://xmlns.jcp.org/jsf/facelets"
                template="./template.xhtml"
                xmlns:h="http://xmlns.jcp.org/jsf/html"
                xmlns="http://www.w3.org/1999/xhtml">


    <ui:define name="top">
        Title : #{bean.title}
    </ui:define>

    <ui:define name="content">
        <h:form>
            <h:panelGrid columns="2">
                <h:outputLabel value="First Name" class="label"/>
                <h:inputText value="#{bean.person.firstName}"/>
                <h:outputLabel value="Last Name" class="label"/>
                <h:inputText value="#{bean.person.lastName}"/>
                <h:outputLabel value="Customer Notes" class="label"/>
                <h:inputTextarea  value="#{bean.person.notes}"/>
            </h:panelGrid>
        </h:form>
    </ui:define>

    <ui:define name="bottom">
        Footer goes here
    </ui:define>

</ui:composition>
This quick and simple form produces the following page. Each form you create can use the same template with different content.
Incidentally, you don’t need to use Netbeans JSF page creator, I just find it handy to use as a starting point. You can quite simply take these two samples and copy and paste them into your own pages and with a small tweak to use your own css you should have a working page.