Installing Servers into Eclipse
- Installing and configuring Eclipse
- Download and install a web server
If you want to do some web development with Eclipse, you will need a web server for it to run on. The process for adding a server to Eclipse is usually the same for different server vendors. Typically though each vendor has different configuration options for setting up the server. For now, we’ll look at adding the server into the Eclipse environment.
Adding Servers
Servers are added by letting Eclipse know what type of server you want to install and where it is installed locally. You must have already downloaded and installed a web server before adding it into the Eclipse environment.

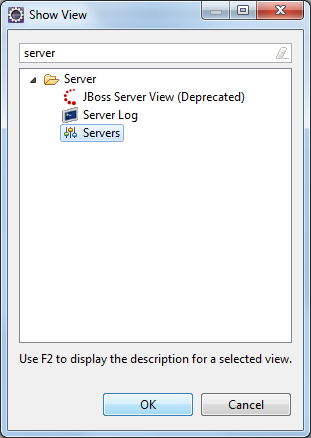
- Select Window->Show->Other… to bring up the view selector.
- Start typing server and you will see the view list is filtered.
- We want the Servers view, not the JBoss Server View, that is now deprecated.
- Double click on the Servers item and the view selector will close and the Servers tab will open up in the bottom half of the IDE window.
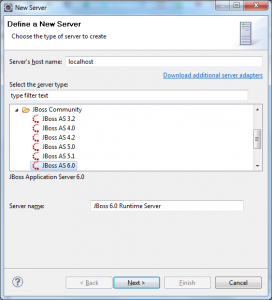
- In the Servers window, right click and select New->Server to bring up the New Server dialog
- Select the appropriate server runtime for the server you are using from the list. If your server doesn’t appear in the list then click the “Download additional server adapters” link above the list.
- Adding a new server adapater
- In the Install New Extension dialog, wait for it to finish downloading the list of available server adapters and try and find the right one for your server.
- Once found, select your server and click Next, agree to any license terms and click Finish to install the adapter.
- Once installed, you should restart Eclipse when asked. Upon restarting, you will need to go back to step 5 of this process except this time, your server should appear in the initial list.
- When you have found your server type in the list of servers, click Next and fill in any required details. This should mostly be about telling Eclipse in which directory the server installation is located and click Next. For most servers it will let you know if you are pointing it to the wrong directory or it cannot find the installed server in that directory.
- The Add and Remove tab lets you add existing projects in the workspace to the new server. Unless you have any open projects, you don’t need to worry about this right now.
- When you click finish, your new server should appear in the Servers panel. Click on it, expand it and right click on it, and you can see there are options for starting, stopping and restarting the servers. When you add projects to the server, you will be able to select them for republishing.
With a server installed, you can develop web applications using Eclipse and it will deploy the application for you when needed. This is if you downloaded the version of Eclipse for Java EE developers. If you download and install the m2Eclipse plugins you will be able to develop and deploy Maven web projects in Eclipse with the same benefits.
- Installing JBoss Developer Tools
One thought on “Installing Servers into Eclipse”
Comments are closed.

Thanks Andy for this great series of articles 🙂 I just want to add a detail which almost drove me crazy the last hours:
If you are using the m2 maven plugin in eclipse, you definitely want to add the m2eclipse EXTRAS for WTP integration and recognition of maven projects in the server view.
(http://m2eclipse.sonatype.org/installing-m2eclipse.html)
cheers,
Jan