Procedural Terrain With Java – part 1
Every year, around Christmas time I always get a hankering to write some 3D terrain rendering code. Not so much the actual rendering engine, that part has already been done with 3D APIs such as OpenGL and Direct X. Its more about rendering a 3D terrain generated by code, more specifically pseudo-random numbers, enabling a continuous never ending terrain.
This year I’m getting a head start, and to celebrate that, I’m going to blog it as I go. I’m going to be using Java with JMonkeyEngine APIs on top of the LWJGL OpenGL libs. I quite like JMonkeyEngine as it puts more control into your code giving with the power of the Java language. Being Java based means it is flexible enough to use some good design patterns and code structure without too much rigidity and I can unit test my logic too!
So, with that, I’m going to create a Maven project which will pull in the JMonkeyEngine libs and create a very simple, cube lit by a sun. I’m going to be using Java 13 and the latest JMonkeyEngine version (3.2.4 -stable). If you’ve looked at JME before, this probably isn’t going to be anything earth shattering, but serves as a solid ground for part II.
Start by creating a new simple Maven project and add the following content in the pom.xml file.
	<properties>
		<project.build.sourceEncoding>UTF-8</project.build.sourceEncoding>
		<maven.compiler.source>13</maven.compiler.source>
		<maven.compiler.target>13</maven.compiler.target>
		<jme-version>3.2.4-stable</jme-version>
	</properties>

	<repositories>
		<repository>
			<id>JCenter</id>
			<url>https://jcenter.bintray.com/</url>
		</repository>
	</repositories>

	<dependencies>
		<dependency>
			<groupId>org.jmonkeyengine</groupId>
			<artifactId>jme3-core</artifactId>
			<version>${jme-version}</version>
		</dependency>

		<dependency>
			<groupId>org.jmonkeyengine</groupId>
			<artifactId>jme3-terrain</artifactId>
			<version>${jme-version}</version>
		</dependency>

		<dependency>
			<groupId>org.jmonkeyengine</groupId>
			<artifactId>jme3-plugins</artifactId>
			<version>${jme-version}</version>
		</dependency>

		<dependency>
			<groupId>org.jmonkeyengine</groupId>
			<artifactId>jme3-lwjgl</artifactId>
			<version>${jme-version}</version>
		</dependency>
	</dependencies>

	<build>
		<plugins>
			<plugin>
				<groupId>org.apache.maven.plugins</groupId>
				<artifactId>maven-compiler-plugin</artifactId>
				<version>3.8.0</version>
				<configuration>
					<source>${maven.compiler.source}</source>
					<target>${maven.compiler.target}</target>
				</configuration>
			</plugin>
		</plugins>
	</build>
</project>
Now at some point, you will have to download the JMonkeyEngine SDK to get the binary libraries to use with JME. For now, we just need one, which is liblwjgl64.so. Your filename may be different depending on the platform and 32/64 bit. This is the lib for supporting the LWJGL and for now, can go in the root of the project folder, next to the pom.xml file.
Our next step it to write a piece of code which will get us displaying some graphics in a page. We’ll create a main class which inherited from the SimpleApplication class in the JME library.
import com.jme3.app.SimpleApplication;

public class Main extends SimpleApplication {

  public static void main(final String[] args) {
    final Main app = new Main();
    app.start();
  }

  @Override
  public void simpleInitApp() {

  }
}
Run that and you should get the JMonkeyEngine splash screen where you can pick your settings, and upon clicking OK, you should see a big black screen with some debug information on it:
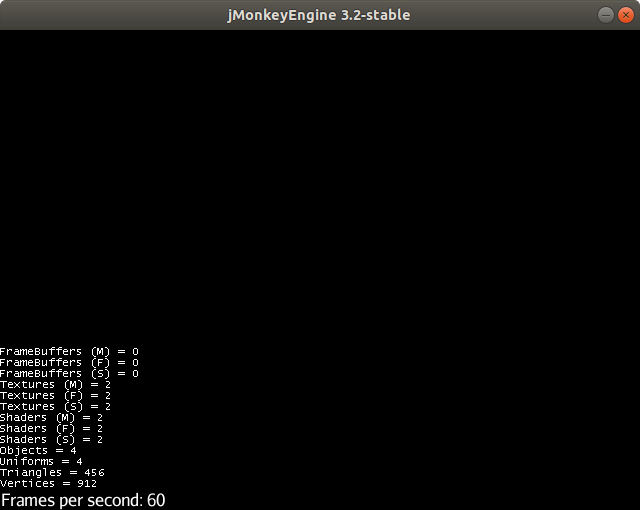
Not much is going on here, just some debug information including our FPS rate. Of course, we haven’t added anything to the display yet. So we need to add some light and an object. We’ll also position the camera from where we are generating the image so we can get a good view. We’ll do this in the simpleInitApp method that is used to initialise the content.
  @Override
  public void simpleInitApp() {

    // move up, to the side and look at the origin
    getCamera().setLocation(new Vector3f(-4, 5, 10));
    getCamera().lookAt(Vector3f.ZERO, Vector3f.UNIT_Y);

    // lets put some light in
    final DirectionalLight sun = new DirectionalLight(new Vector3f(0.2f, -0.6f, -0.5f).normalize());
    sun.setColor(ColorRGBA.White);
    rootNode.addLight(sun);

    // create a simple box
    final Box b = new Box(1, 1, 1);
    final Geometry geom = new Geometry("Box", b);

    // create a very plain lit material
    final Material mat = new Material(assetManager, "Common/MatDefs/Light/Lighting.j3md");

    // assign this material to the box geometry.
    geom.setMaterial(mat);

    // add the geometry to the scene and we are good to go
    rootNode.attachChild(geom);
  }
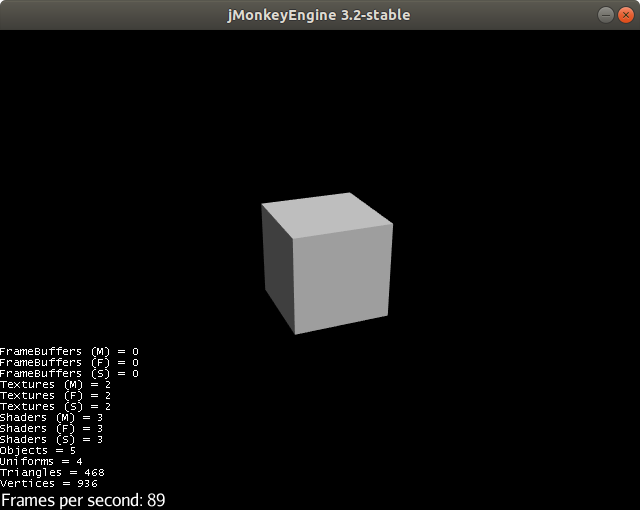
This article isn’t meant to be primer on 3D graphics, or JMonkeyEngine in particular, but this is a simple application that will get you up and running with a simple lit scene in JME with Java.
We move the camera and look at the box so we can see all 3 sides and get an idea of how they are shaded. The directional light has no position so its only influence on shading depends solely on the angle between the box face and the direction of the light that was specified in the constructor. The material we have used is a simple lit material using the default parameters.
If you run this, you will see a simple scene with a lit box that you can use the mouse to look around with and the WASD keys to move around in.
This gets us up and running with JME. Next time we’ll look at creating a simple terrain using code, in particular the JME noise functions to create terrain.