Create A New Project With Maven Archetypes
- Install Maven
In this tutorial, we will create a new project using the Knappsack Archetypes and compile and deploy it. For this example, we will use the jee6-basic-archetype. Before you begin, you will need to have installed Maven, but you no longer need to manually install the Knappsack Archetypes as they are in the Central Maven Repository now, so you just need to make sure your index is up to date. These instructions will work for any Maven Archetype you have installed and creating new maven projects in general.
Maven archetypes can be thought of as templates that are installed into the Maven environment and can be used to generate new applications from scratch that are pre-configured for certain environments, whether it is Java EE 6, Wicket or Spring. We can create our project using either the command line or an IDE and both Eclipse and Netbeans both have support for Maven. Netbeans has it out of the box while Eclipse requires m2Eclipse to be installed. This tutorial covers all three methods of creating projects from Maven.
New project from the Command Line
- Start by opening up a command prompt and navigating to the directory your project will reside in
- The easy way to create a project on the command line is to just type
mvn archetype:generate
We will use the easier version where we don’t have to specify long command lines that include the group and archetype Ids and versions.
- You will be greeted with a long list of possible archetypes with a number next to them and a prompt at the bottom to enter the number of the archetype you want to use.
4: local -> jee6-minimal-archetype (Minimal Java EE application with a single page demo of CDI, JSF, JPA and Validation to ...
5: local -> jee6-basic-archetype (Basic Java EE application with just configuration for CDI, JSF, JPA and a sample empty page.)
6: local -> jee6-sandbox-archetype (Sandbox project for Java EE 6 with CDI, JSF, JPA and a sample model and test data to play ....
7: local -> jee6-sandbox-demo-archetype (Complete demo example using CDI, JSF, JPA and validation showcasing a number of ...
8: remote -> docbkx-quickstart-archetype (null)
9: remote -> j2me-simple (Maven 2 Archetype for midlet application using j2me-maven-plugin)
10: remote -> vaadin-archetype-clean (This archetype generates a simple Vaadin application as a Maven project...
...
...
...
...
Choose a number: 65:
Hint : Your locally installed ones should be near the start of the list. The default number (in this case 65) is the quickstart archetype to produce and empty maven project.
- Enter the number of the Knappsack archetype you want to use and press enter.
- You will then be asked to enter a number of different properties for the project :
Define value for property 'groupId': : com.yourcompany
Define value for property 'artifactId': : yourprojectname
Define value for property 'version': 1.0-SNAPSHOT:
Define value for property 'package': com.yourcompany:
Confirm properties configuration:
groupId: com.yourcompany
artifactId: yourprojectname
version: 1.0-SNAPSHOT
package: com.yourcompany
Y:
Here we assumed the version is the default SNAPSHOT version and that the default package is the same as the groupId value.
- Once complete, if you look in the directory you will see a new directory called
yourprojectname. Move into this directory and if you haveJBOSS_HOMEset up you can deploy the project straight away.mvn clean package jboss:hard-deploy
Start up JBoss if it isn’t already and go to http://localhost:8080/yourprojectname/home.jsf.
- You can now import this project into an IDE such as Eclipse or Netbeans as these IDEs recognize Maven projects
Alternatively, you can use the command line to enter one long command, or as I do, put it in a script or batch file that I can edit in a text editor and run it from there. Here’s an example to get you started which you can copy and paste:
mvn archetype:generate -DarchetypeGroupId=org.fluttercode.knappsack -DarchetypeArtifactId=jee6-sandbox-demo-archetype -DinteractiveMode=false -DarchetypeVersion=1.0.4 -DgroupId=org.application -DartifactId=sandboxdemo -Dpackage=org.application
Creating a project in an IDE
Creating a Maven project in an IDE is much easier, although sometimes not by much. Typically, you choose to create a new project in the IDE and select maven as the type of project you want to create.
Netbeans
- Select File->New Project and in the first list, select Maven and on the right hand side, select Maven Project (not Maven Web Application). Click Next.
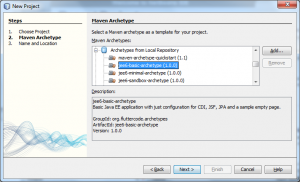
- Here we will pick our archetype to create our application from. In the list, expand the Archetypes from Local Repository item in the list. If you don’t see the archetypes there, you might need to refresh the index in the IDE. Close the new project window to do this.
- Select Window->Other->Maven Repository Browser to open the repository browser.
- In the repository browser window, right click on the repository and select Update Index.
Now you should be able to start the new project from scratch and see the missing archetypes.
Once you have selected the archetype, click finish to setup the project properties.
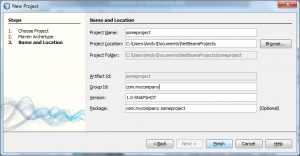
- The project properties are the group and archetype Id for the new project as well as the optional default package name.
You will also configure the project location here and click Finish when done.
- Once complete, Netbeans will create your project and open it up. To run it, click Run->Run Main Project and it will prompt you for a Java EE 6 server to use. Select one and click ok. Remember that you need to change the datasource name in
persistence.xmlso it is not looking for the JBoss default datasource name.
Eclipse
First make sure you have m2Eclipse installed and are running Eclipse under a JDK instead of a JRE. For more details see this Installing and configuring Eclipse tutorial.
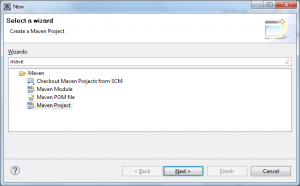
- In Eclipse, click on File->New->Other.. to bring up the dialog for new projects and start typing “maven” in the search box
Select the maven project item from the list and click Next.
- This page lets you determine where the project will reside. Leave the defaults, but make sure the “Create simple project” option is unchecked and click Next.
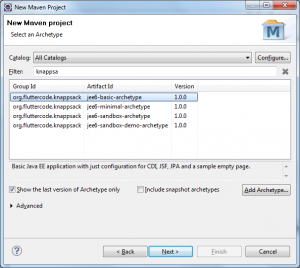
- Here we will pick our archetype which in this case is our Knappsack jee6 minimal archetype. Start typing “knappsack” in the list and you will see the list of available Knappsack archetypes. Again, it is possible that the IDE’s index of the local repository is not up to date and needs a refresh. You will need to cancel the project creation window to do this.
- Select Window->Show View->Other and in the view selection , start typing “Maven” until you see the window “Maven Repositories”. Select this to open up the view.
- In the Maven Repositories view, expand the Local Repositories item and right click click on the Local Repository (pathname) item and select Rebuild Index. Confirm that you want to rebuild the index and wait a few moments.
- Restart the project creation and this time you should see the archetypes you are looking for.
Select the archetype you want to create and click Next.
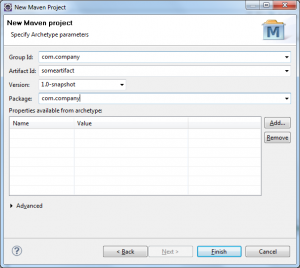
- Now we need to enter the project configuration information, what our project is called, give it a group id, version and default package.
Once the above information is entered you can click Finish and Eclipse will work away at creating your project
- To run the project, the easiest way is to install a server in Eclipse (see Tutorial on adding servers in Eclipse) and add the new project to the server. Start the server and navigate to your main page to see it in action.
